Configuration for Block Production
Each Block Producer instance should use this document to configure their networking and to ensure a secure connection between all other Block Producers. We use a service called Wireguard, a private VPN.
Setting up Wireguard VPN
Wireguard software will be used to connect the nodes (instances) to each other in a secure, stable, and reliable way.
Install Wireguard
sudo apt-get install software-properties-common
sudo apt-get update

sudo add-apt-repository ppa:wireguard/wireguard
sudo apt update
sudo apt install wireguard
Install resolvconf
sudo apt install resolvconfCreate a directory for your producer data and cd into it.
Generate Keys
wg genkey | tee wg-private.key | wg pubkey > wg-public.key


Run the following to print the data to the console.
cat wg-public.key
cat wg-private.key
Setup wireguard interface
sudo vim /etc/wireguard/ultra_nodes.conf
OR
sudo nano /etc/wireguard/ultra_nodes.conf
Ultra will provide an example of this configuration.
[interface]
Address = 192.168.1.1/32
ListenPort = 45888
DNS = 1.1.1.1
PrivateKey = YOUR WIREGUARD PRIVATE KEY

# Producer
[Peer]
PublicKey = YOUR WIREGUARD PUBLIC KEY
AllowedIPs = 192.168.1.1/32
# YOUR PUBLIC IP FOR LINUX
# RUN:
# curl icanhazip.com
Endpoint = ip:45888
PersistentKeepalive = 20

# API-SEED-1
[Peer]
PublicKey = 1vBm7TyQl2KHgU/pG...
AllowedIPs = 192.168.1.2/32
Endpoint = 35.224.180.12:45888
PersistentKeepalive = 20

# API-SEED-2
[Peer]
PublicKey = jOYj5L97khV10o0zHzv2...
AllowedIPs = 192.168.1.3/32
Endpoint = 35.189.216.255:4
Start the VPN
wg-quick up {yourpath/interface_name}If you ever find yourself needing to stop wireguard; this can be done by running:
wg-quick down {yourpath/interface_name}Check the connection
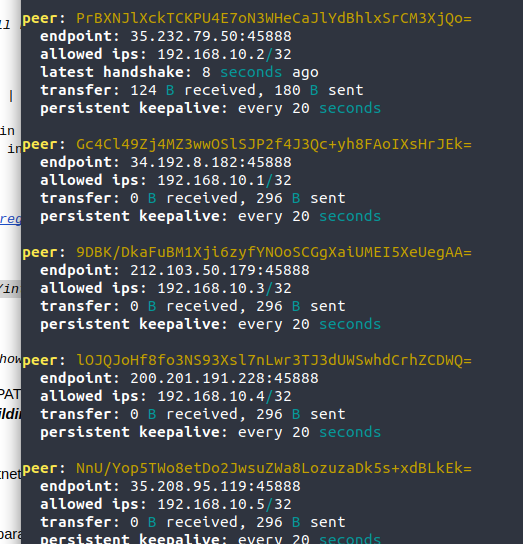
sudo wg showRespectively you should see the following or similar if you have a peer added other than yourself.

Add the path of the nodeos binaries to your PATH environment variable, if you haven’t already.
Create a new folder for the network (eg.: ultranet)
Create a folder for the kind of node (Eg.: producer, api...)
Create logs folder
Create a config.ini provided by Ultra
Copy startup.sh and stop.sh scripts provided by Ultra
Get the genesis.json file
Note
Always use the startup.sh / stop.sh or nodeos-launcher scripts to manipulate nodeos.
For every instance (producers, APIs), you must run nodeos for the first time with --genesis-json option.
Only if running an API/Seed instance
Install nginx
sudo apt install nginxConfigure server to run at port 80
sudo vim /etc/nginx/sites-available/default
OR
sudo nano /etc/nginx/sites-available/default
Example Configuration
server {
        listen 80 default_server;
        listen [::]:80 default_server;
        server_name { external_server_ip };

        location /v1/ {
                proxy_pass http://127.0.0.1:8888/v1/;
        }

        location / {
                root /home/ubuntu/ultra_testnet/www;
               # return 200 "ultra testnet";
        }
}
Enable the nginx service
sudo systemctl enable nginxStart the service
sudo systemctl start nginx
**sudo nginx -s reload -> reload service in case of any config change**
sudo nginx -s reload -> reload service in case of any config change
Install certbot for nginx (only for API instance)
Run bot to generate ssl certificates (https - port 443)
sudo certbot --nginx -d {server_address_or_domain_including_www_if_necessary}Check if the nginx config file (default -> /etc/nginx/sites-available/default) was edited by the bot
Configure the Firewall
WARNING!
- Do not activate the firewall before certifying that the ssh port is open, as you could lose access to the server and you'll have to recreate your instance.
sudo ufw app list
sudo ufw allow "Nginx Full"
sudo ufw allow 45888/udp
sudo ufw allow 9876/tcp
sudo ufw allow 22
sudo ufw allow in on {server_name_any_name} proto tcp to any port 19876
sudo ufw enable

# Useful commands
sudo ufw status numbered -> status
sudo ufw delete [id] -> delete a rule
Configure a load balancer for the APIs. Refer to the NGINX documentation for more details.
Producer Control Switch
The Producer Control Switch is a device (normally a PC) that has exclusive access to all the Producers. Its function is to access the producer plugin in order to do operations like stop/pause some producer, switch to the fail over producer, check the producer status, check the peer status and other very important actions related to the producer management.
The main idea is to have all Block Producer's producer nodes able to produce (with the producer plugin enabled, signature, etc), but the backup producer will be in pause mode. If something happens to the main producer or some maintenance procedures needs to be done, the Block Producer can switch to the backup producer until the main one is stabilized. This management can be done automatically, using a NodeJS script to handle the main and the backup producer or manually.